


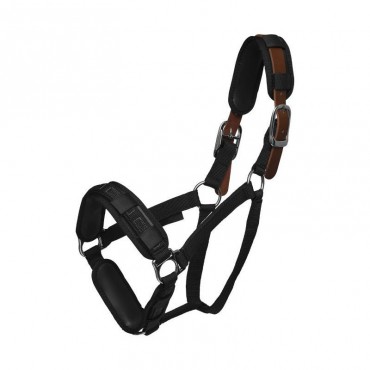
ThinLine® Grazing Basket
- Write a review
Advantages and features of our ThinLine® Grazing Basket
- No friction
- The flexible basket is gentle on skin, teeth, and lips
- Works perfectly with all waterers
- Incredibly flexible and very light
- Durable material
The ThinLine® grazing muzzle is designed to be softer, lighter, and offer less of a sense of confinement! The perfect grazing muzzle for horses, ponies, and drafts!
Advantages and features of our ThinLine® grazing muzzle
- No rubbing
- The flexible basket is gentle on the skin, teeth, and lips. Softer, lighter, and safer
- Works perfectly with all waterers (including automatic waterers)
- Has UV protection for delicate noses
- Incredibly flexible and very lightweight
- Durable material
Why do you need a grazing muzzle for your horse?
Preventing overgrazing and unwanted weight gain, laminitis, colic, and obesity are among the most serious health conditions. Grazing and weight management are crucial elements in your horse's health prevention. Grazing throughout the day plays an essential role in the digestive health of horses as the constant presence of grass keeps gastric acids busy and balanced.
Built from durable and flexible material that dramatically enhances comfort, it is also gentle on the teeth and lips of equines.
The grazing muzzle is well-ventilated, safe, and ideal when combined with the ThinLine® flexible halter.
Which size to choose for the ThinLine® muzzle?
Our horse muzzle is available in 3 sizes:
- Mini / Pony
- COB / Horse
- Extra-large
Which one to choose? You can choose the same size as your halter. So if you have a pony halter, you choose the ThinLine pony. Very easy!
About the grazing hole size.
Veterinary recommendations for safe grazing in a horse muzzle are a grazing hole of 3.5 to 4 cm for full-time grazing 24/7.
What do you need to set up your muzzle?
The muzzle comes with temporary attachments that can be removed and reattached, as well as permanent attachments (like hose clamps) that, once closed, need to be cut to be removed. First, test the adjustment with the temporary attachments. Once the adjustment is correct, replace them with the permanent attachments.
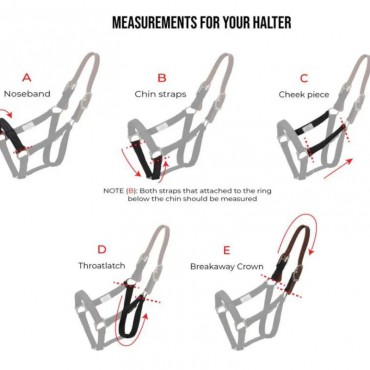
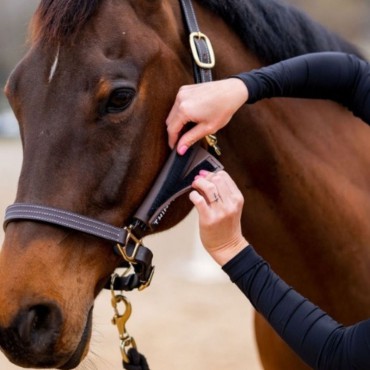
Step 1: Choose a properly sized safety halter. Put the halter on the horse and make sure it is well adjusted, not too high or too low. The noseband should not rest on the floating bone of the nose (in this case, the halter is too low) but should sit squarely on the bridge of the nose. Ask a friend to hold your horse.
Step 2: Identify the two tabs on the muzzle that have a cut-out triangle at the base. These are the tabs that go on the sides at the level of the side rings of the noseband. Position the muzzle in front of the horse's nose, it should lightly touch the lips without pressing firmly. Look at the side rings of the halter to see which holes to attach to. Now attach the two side tabs with the temporary attachments. Make sure they are attached at the same level on the left and right. The two tabs should be positioned at mouth level. If they are too low (near the chin), attach them to the noseband itself.
Step 3: Then fasten the three tabs on the bridge and the three tabs under the chin. On the ThinLine® halter (sold separately), there are notches that help keep the halter in place. To start, attach the temporary attachments to the 6 tabs, fastening them one hole looser than the two side tabs. This will allow for a "bounce" around the nose, like a bubble. Tighten all the temporary attachments to ensure it doesn't move during the trial. If it seems like the muzzle is not the right size, stop the trial here. It can only be exchanged if it has not been used. If the horse grazes with it, it will no longer be exchangeable.
Step 4: Give it a try by letting the horse graze to see if it works. Don't be surprised if the horse tosses its head a bit, ignores the grass, or shakes. It takes time for the horse to understand that it can eat through the hole. Feel free to offer some tufts of grass, a treat, or a few carrot slices through the hole to help it understand. If you need to adjust the setting, do it now. When properly fitted, the basket should be close to the horse's nose but not actually touching it. It may lightly touch, as the basket will give a little over time. If the basket is pressing hard on the nose, simply lengthen the straps under the chin to move the basket away from the nose. Make sure the hole for the grass is positioned in front of the mouth and not under the nose or chin.
Step 5: Once you are satisfied with the temporary adjustment, remove the headcollar and replace the temporary fastenings with the permanent ones (do this away from the horse's head). To do this, pass them through the basket hole, then through the ThinLine® headcollar notch, and again through the basket holes. Pull the cable tie as close as possible to the hole before passing it back through to close it. Tighten the cable tie to its maximum before cutting, without breaking the basket. Cut off the excess end of the cable tie once closed. The cable tie should be closed from top to bottom as shown in the photo (to prevent debris from getting caught). To remove the cable ties, you need to cut them and replace them. Eight additional cable ties are provided with the basket. If necessary, replacement cable ties are sold separately. It is important to use the provided cable ties because they are designed to break more easily than the basket. If the horse gets caught, the cable ties will break without tearing the basket. The basket is not guaranteed if attached with cable ties other than the brand's own.
Maintenance Tips
If the basket discolors, place it in a bucket with water and dish soap. Let it soak for a few hours, then scrub with a hard brush.
What materials are used in the ThinLine® grazing muzzle?
The ThinLine® muzzle is made from one of the most durable polymers on the planet. It is resistant to fungi and UV rays. It is safe, effective, and long-lasting. This means there are no "outgassing" materials, so they are safe near the horse's nostrils. Even if accidentally ingested, the polymers comply with US food safety regulations.
The horse grazing muzzle is ideal for slowing down fast eaters, limiting grazing, and can help reduce overweight issues. It works extremely well with all automatic waterers and has UV protection that acts as a kind of sunscreen for sensitive noses.
Related Products?
- ThinLine flexible headcollar and detachable spare parts: A must-have if you want your horse to be completely safe in the pasture, day after day!
- Additional cable ties
- Headcollar protectors

Be the first to ask a question about this product!
Accessories
-

ThinLine® safety halter
66,00 €


Customers who bought this product also purchased...

Products in the same category:


Blog
-

Equine Metabolic Syndrome (EMS)
2024-03-13
Equine Metabolic Syndrome (EMS) is a condition characterized by impaired insulin production and abnormal fat distribution in equines. Insulin, a pancreatic hormone normally responsible for the entry of glucose into cells, is ineffective in this case, leading to an accumulation of glucose in the blood and lymphatic circulation.